
The First 50 Steps of a Stable Diffusion Text2Image Generation
This site utilizes Google Analytics, Google AdSense, as well as participates in affiliate partnerships with various companies including Amazon. Please view the privacy policy for more details.
One of the exciting developments in AI right now is text-to-image generation.
Basically you enter in a prompt - say, a photograph of of a cyberpunk ninja, high resolution, wide angle lens - and the AI will generate a rather impressive image based on that prompt. (In fact, a whole field has emerged in the past few months called prompt engineering - that’s why the example prompt I just gave ends in high resolution, wide angle lens.)
There’s three big players right now - DALL·E 2, MidJourney, and Stable Diffusion.
I’ve played around a bit with both DALL·E 2 and Stable Diffusion. With DALL·E 2, you have to use their server. Stable Diffusion is more open source - you can run it locally.
I don’t have a GPU, so I’ve been running this Stable Diffusion Web UI in Google Colab.
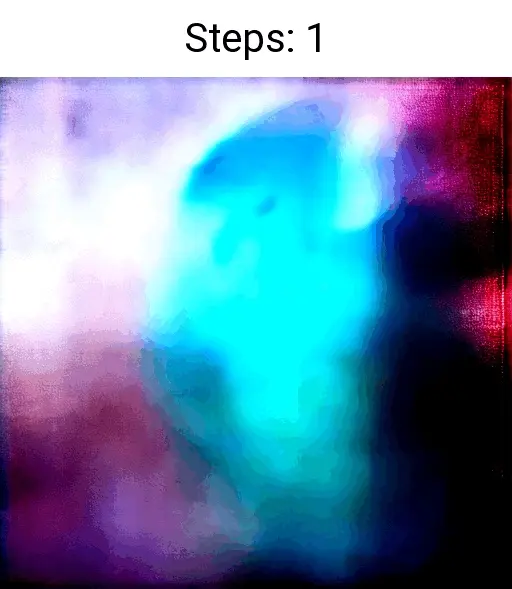
Ever the curious, I wanted to see how the algorithm (that is, the AI) developed these images. Stable Diffusion - and the accompanying Web UI - gave me the controls needed to do this.
First, let me display the end-result animation, then I’ll going in to how I made it:
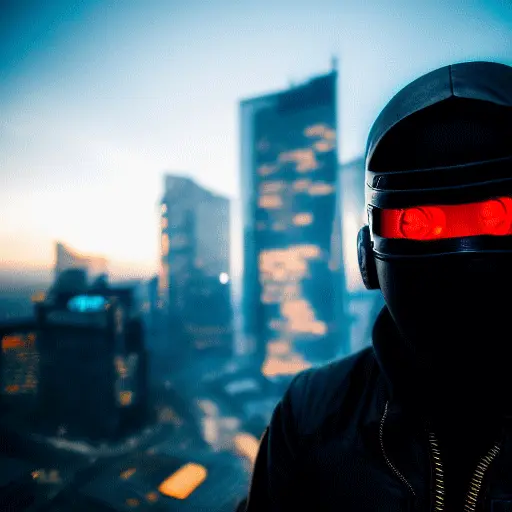
The prompt for this image is photograph of of a cyberpunk ninja, high resolution, wide angle lens.
There’s also a negative prompt - things the AI tries to avoid. The negative prompt I entered is ugly, deformed.
I used the Euler a sampler. The other samplers (at least right now, there could be more added in the future) are Euler, LMS, Heun, DPM2, DPM2 a, DPM fast, DPM adaptive, LMS Karras, DPM2 Karras, DPM2 a Karras, DDIM, and PLMS. While I’m not entirely sure what all these are, they have something to do with the mathematical model of the neural network.
I also used a classifier-free guidance (CFG) scale of 15. The higher the CFG scale, the more the AI tries to make the image exactly match the prompt. The lower, the less it tries to match the prompt. There’s a Reddit video of different CFG scales for the same parameters if you’re interested.
There’s also steps - basically how long the AI will try to make the image. I chose 50 steps for the final image. The above animation shows steps 1 through 50.
Finally (other than image size) I used a seed of 2337331035. The seed is a random value that determines the starting point of the image generation. I didn’t choose this seed - it was randomly chosen for me. However, if I want to get the same results in another run - or to accurately compare changes in different parameters - I need to set the same seed.
The Stable Diffusion Web UI let me output each step at once instead of having to manually make 5 different runs. This gave me one long image:

To split it up I used ImageMagick. The command to split the image looked something like:
magick cyberpunk-ninja.png -crop 2%x100% frame.png
I then also used imagemagick to make the animation:
magick frame*.png -gravity center -crop 1:1 +repage -set delay 50 cyberpunk-ninja.gif
And I reduced the size of all images in this post by converting them to webp (including the animated gif):
magick .\cyberpunk-ninja.png .\cyberpunk-ninja.webp
magick .\long-image.png .\long-image.webp
magick .\cyberpunk-ninja.gif .\cyberpunk-ninja.gif.webp
Finally, if you just want to look at the final image, here it is:
Leave a Reply
